製作狀態列的提醒內容(Notification)


狀態列在手機畫面的最上方,作用是提醒或通知使用者一些訊息,如下圖


只要使用 Notification 這個類別,你也可以製作自己的狀態列訊息,基本的程式碼如下

   1:          Intent it = new Intent(this,Table_Flow.class);
   2:          it.setFlags(Intent.FLAG_ACTIVITY_NEW_TASK);
   3:          PendingIntent pi = PendingIntent.getActivity(All_List.this, 0, it, 0);
   4:          
   5:          Notification nn = new Notification();
   6:          nn.icon = R.drawable.notpic;
   7:          nn.tickerText = "歡迎使用極簡黑記帳本!!!";
   8:          nn.defaults = Notification.DEFAULT_ALL;
   9:          nn.setLatestEventInfo(All_List.this, "極簡黑記帳本", "歡迎使用極簡黑記帳本!!!", pi);
  10:   
  11:          NotificationManager nm;
  12:          nm = (NotificationManager)getSystemService(NOTIFICATION_SERVICE);
  13:          nm.notify(0, nn);

第 1 行第 1 個參數為目前的類別,第 2 個參數為點選狀態列的訊息執行的類別
第 2 行設定 Flags
第 3 行設定 PendingIntent , 第 1 個參數為目前類別,第 2 個參數為 requsetcode , 第 3 個參數為 intent , 第 4 個參數為 flag
第 5 ~ 8 行就是狀態列的顯示內容
第 6 行為顯示圖形,尺寸為 30x30
第 7 行為顯示內容
第 8 行為出現訊息時的預設行為,包括手機震動,音效,指示燈
第 9 行為點選狀態列之後出現的內容
第 11 ~ 13 行發送剛剛的 Notification

上面的內容可以在應用程式離開前使用

結果為
結束應用程式後


點選狀態列


上架 google play(android market) 的準備


1.先來做 icon 吧, Android 支援各種不同的尺寸,可以製作 96x96(x), 72x72(h), 48x48(m), 36x36(l), 4種不同尺寸的 icon 圖, 我使用 firework 來作圖, 先製作 96x96 的 icon , 之後的尺寸再調整就可以了
先製作 icon 底圖, 底圖最好小於該尺寸 10 個單位,以 96x96 為例,下面底圖最好是 86x86


接著就根據自己的喜好,加上圖案吧,設計完成後,再調整各個尺寸,如 72x72 的 icon 就設定為 62x62 ,接著到 專案\res\drawable-xhdpi , res\drawable-hdpi , res\drawable-mdpi , res\drawable-ldpi, 替換原先的 ic_launcher.png


2.更改應用程式名稱,到 AndroidManifest.xml 中尋找 <application 中的 android : label ,修改其內容

3.製作 apk 檔, 製作 apk 檔之前必須先製作金鑰檔,上架時上傳的 apk 必須先經過金鑰來簽名,製作金鑰檔的方式為

開啟命令提示字元 -> 輸入 keytool ,會顯示一連串可用的命令如下


接著輸入

keytool -genkey -v -keystore testkey.store -alias testkey.keystore -keyalg RSA -validity 20000
-genkey 為產生key , testkey.store 為 金鑰檔 -keyalg 為演算法, -validity 為有效日 50年(最好超過)

接下來會出現一些填資料的畫面如下


最後會產生 1 個名稱為 testkey.store 的金鑰檔,回到 eclipse,在專案上點選右鍵,


在必要的地方填入剛剛設定的密碼


最後選擇位置


製作 apk 檔完成!!!

最後就是登入後台並上傳檔案,當然在後台還有一些資料需要設定,不過大部分都是圖案等等


如何製作上鎖功能(EditText + SharedPreferences)


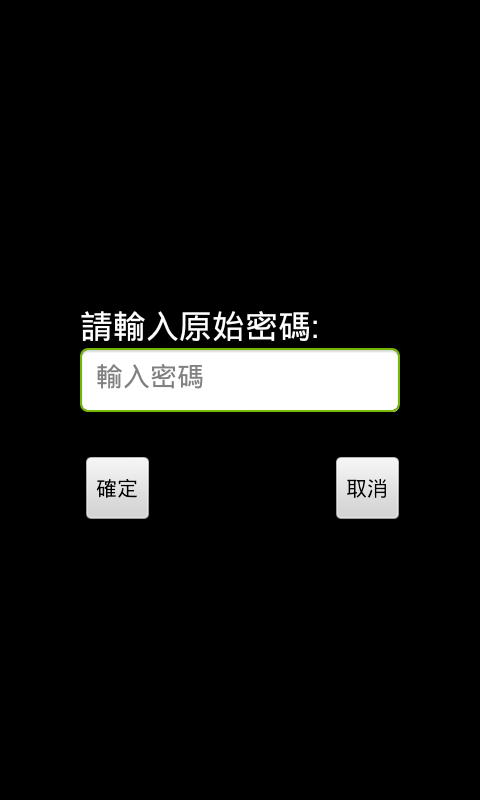
上鎖功能相當簡單,基本上只需要 EditText 和 SharedPreferences(也可以使用其它的儲存類別如 fileoutputstream,SQLite) 就能完成,,不過為了操作的方便,我還加上了 button 和 textview ,基本介面如下
開鎖畫面


輸入密碼畫面


而程式碼的實作原理也相當簡單,為了不把主流程複雜化,我把解鎖(UnLock_Flow.java)和加鎖(Lock_Flow.java)分開成2個類別,首先在主流程開始前先判斷是否有密碼鎖,有就先進解鎖,沒有就直接開始主流程,而在主流程中會有個選項是加入密碼鎖的選擇,點選進入 Lock_Flow.java,相當簡單吧

首先在主流程中判斷的方法如下

   1:      void lock() {
   2:          // get data for accountdetail
   3:          SharedPreferences sp = getSharedPreferences("bcn", 0);
   4:   
   5:          // get accountdetail count
   6:          String passstr = sp.getString("adlock", "");
   7:          
   8:          // no lock
   9:          if(passstr.equals("")){
  10:              
  11:          }
  12:          //lock exist
  13:          else {
  14:              
  15:          //call Lock_Flow
  16:              Intent inte = new Intent();
  17:              inte.setClass(All_List.this, UnLock_Flow.class);
  18:              
  19:              startActivityForResult(inte, 3);
  20:              overridePendingTransition(R.anim.zoom_enter, R.anim.zoom_exit);
  21:          }
  22:      }


其中 SharedPreferences 的用法請參考這篇,本篇不再多加詳述
第 9 行判斷內容是否為空,是的話代表沒有密碼鎖直接進入主流程,否的話就呼叫解鎖類別(16 ~ 20 行)

解鎖類別(UnLock_Flow.java)如下

   1:  package com.example.helloworld;
   2:   
   3:  import FoXxLib.FP;
   4:  import android.annotation.SuppressLint;
   5:  import android.app.Activity;
   6:  import android.app.AlertDialog;
   7:  import android.content.DialogInterface;
   8:  import android.content.SharedPreferences;
   9:  import android.os.Bundle;
  10:  import android.view.KeyEvent;
  11:  import android.view.View;
  12:  import android.view.View.OnClickListener;
  13:  import android.widget.Button;
  14:  import android.widget.EditText;
  15:  import android.widget.TextView;
  16:  import android.widget.Toast;
  17:   
  18:  @SuppressLint("NewApi")
  19:  public class UnLock_Flow extends Activity {
  20:   
  21:      EditText et;
  22:      Button byes;
  23:      Button bno;
  24:   
  25:      TextView tv;
  26:   
  27:      int tryNum = 2;
  28:   
  29:      public void onCreate(Bundle savedInstanceState) {
  30:          super.onCreate(savedInstanceState);
  31:   
  32:          initXml();
  33:   
  34:      }
  35:   
  36:      void initXml() {
  37:          setContentView(R.layout.unlockflow);
  38:   
  39:          tv = (TextView) findViewById(R.id.textView1);
  40:   
  41:          tv.setText("請輸入密碼解鎖");
  42:   
  43:          et = (EditText) findViewById(R.id.username_edit);
  44:          et.setHint("輸入密碼");
  45:   
  46:          byes = (Button) findViewById(R.id.buttonYes);
  47:          byes.setOnClickListener(new OnClickListener() {
  48:   
  49:              @Override
  50:              public void onClick(View v) {
  51:                  // TODO Auto-generated method stub
  52:   
  53:                  checkPassWord();
  54:              }
  55:          });
  56:   
  57:          bno = (Button) findViewById(R.id.buttonNo);
  58:          bno.setOnClickListener(new OnClickListener() {
  59:   
  60:              @Override
  61:              public void onClick(View v) {
  62:                  // TODO Auto-generated method stub
  63:   
  64:                  // use AlertDialog
  65:                  AlertDialog ad = new AlertDialog.Builder(UnLock_Flow.this,
  66:                          AlertDialog.THEME_TRADITIONAL).create();
  67:                  ad.setTitle("警告!!");// 設定警告標題
  68:                  ad.setMessage("確定離開程序??");
  69:   
  70:                  ad.setButton2("確定", new DialogInterface.OnClickListener() {// 設定按鈕2
  71:   
  72:                              @Override
  73:                              public void onClick(DialogInterface dialog,
  74:                                      int which) {
  75:   
  76:                                  // 點選按鈕2後執行的動作
  77:                                  finishEdit(1);
  78:                              }
  79:                          });
  80:                  ad.setButton("取消", new DialogInterface.OnClickListener() {// 設定按鈕2
  81:   
  82:                              @Override
  83:                              public void onClick(DialogInterface dialog,
  84:                                      int which) {
  85:   
  86:                                  // 點選按鈕2後執行的動作
  87:   
  88:                              }
  89:                          });
  90:   
  91:                  ad.setCanceledOnTouchOutside(true);// 當警告提示出現後,點選提示以外範圍,是否會取消提示,預設是true
  92:   
  93:                  ad.setCancelable(true);// 當警告提示出現後,點選其他實體按鈕(backkey等等),是否會取消提示,預設是true
  94:   
  95:                  ad.show();
  96:   
  97:              }
  98:          });
  99:      }
 100:   
 101:      void checkPassWord() {
 102:   
 103:          if (et.getText() == null) {
 104:              // use Toast
 105:              tryNum--;
 106:              Toast.makeText(UnLock_Flow.this, "未輸入密碼!!!" + "還剩" + tryNum + "次",
 107:                      Toast.LENGTH_SHORT).show();
 108:   
 109:              et.setText("");
 110:          } else {
 111:   
 112:              String tempstr = et.getText().toString();
 113:   
 114:              // get data for accountdetail
 115:              SharedPreferences sp = getSharedPreferences("bcn", 0);
 116:   
 117:              // get accountdetail count
 118:              String passstr = sp.getString("adlock", "");
 119:   
 120:              if (tempstr.equals(passstr)) {
 121:                  Toast.makeText(UnLock_Flow.this, "密碼正確!!!", Toast.LENGTH_SHORT)
 122:                          .show();
 123:                  finishEdit(0);
 124:              } else {
 125:                  Toast.makeText(UnLock_Flow.this,
 126:                          "密碼錯誤!!!" + "還剩" + tryNum + "次", Toast.LENGTH_SHORT)
 127:                          .show();
 128:                  tryNum--;
 129:              }
 130:   
 131:          }
 132:   
 133:          if (tryNum < 0) {
 134:   
 135:              finishEdit(1);
 136:          }
 137:      }
 138:   
 139:      public boolean onKeyDown(int keycode, KeyEvent event) {
 140:   
 141:          FP.p("keycode:" + keycode);
 142:          FP.p("event:" + event.getAction());
 143:   
 144:          finishEdit(1);
 145:   
 146:          switch (keycode) {
 147:   
 148:          // menu key
 149:          case 82:
 150:   
 151:              break;
 152:          }
 153:   
 154:          return super.onKeyDown(keycode, event);
 155:      }
 156:   
 157:      /**
 158:       * 
 159:       * @param result
 160:       *            0 ok
 161:       */
 162:      void finishEdit(int result) {
 163:   
 164:          if (result == 0) {
 165:              UnLock_Flow.this.setResult(0);
 166:   
 167:              UnLock_Flow.this.finish();
 168:   
 169:              overridePendingTransition(R.anim.zoom_enter, R.anim.zoom_exit);
 170:          } else if (result == 1) {
 171:   
 172:              UnLock_Flow.this.setResult(1);
 173:   
 174:              UnLock_Flow.this.finish();
 175:   
 176:          }
 177:      }
 178:   
 179:  }

其中比較重要的為 101 行的 checkPassWord() 方法,會取得 在 et 中輸入的字串內容並與 passstr 字串做比較(120行),相同則解鎖成功(finishEdit(0)),失敗則嘗試次數減少,當嘗試次數減為 0 ,那麼會直接回到主程序再結束 (finishEdit(1))

以上是解鎖的部分,接下來是上鎖的部分,在主程序中會有個按鈕,用來觸發加鎖動作,如下

   1:  //call Lock_Flow
   2:                      Intent inte = new Intent();
   3:                      inte.setClass(All_List.this, Lock_Flow.class);
   4:                      
   5:                      startActivityForResult(inte, 4);
   6:                      overridePendingTransition(R.anim.zoom_enter, R.anim.zoom_exit);

接著是 Lock_Flow.java的內容,必須注意在沒有上鎖的情況下,可以直接設定密碼,完成上鎖,但相反的若已經有上鎖過,則必須先輸入原先的密碼以解鎖,再上鎖,如下

   1:  package com.example.helloworld;
   2:   
   3:  import FoXxLib.FP;
   4:  import android.annotation.SuppressLint;
   5:  import android.app.Activity;
   6:  import android.app.AlertDialog;
   7:  import android.content.DialogInterface;
   8:  import android.content.SharedPreferences;
   9:  import android.os.Bundle;
  10:  import android.view.KeyEvent;
  11:  import android.view.View;
  12:  import android.view.View.OnClickListener;
  13:  import android.widget.Button;
  14:  import android.widget.EditText;
  15:  import android.widget.TextView;
  16:  import android.widget.Toast;
  17:   
  18:  @SuppressLint("NewApi")
  19:  public class Lock_Flow extends Activity{
  20:   
  21:      EditText et;
  22:      Button byes;
  23:      Button bno;
  24:      
  25:      TextView tv;
  26:      
  27:      int tryNum =2;
  28:      
  29:      //0:lock exist 1:no lock
  30:      int flow =0;
  31:      
  32:      public void onCreate(Bundle savedInstanceState){
  33:          super.onCreate(savedInstanceState);
  34:          
  35:          initXml();
  36:          
  37:      }
  38:      
  39:      void initXml(){
  40:          
  41:          setContentView(R.layout.lockflow);
  42:          
  43:          tv = (TextView)findViewById(R.id.textView1);
  44:          
  45:          // get data for accountdetail
  46:          SharedPreferences sp = getSharedPreferences("bcn", 0);
  47:   
  48:          // get accountdetail count
  49:          String passstr = sp.getString("adlock", "");
  50:          
  51:          //no lock
  52:          if(passstr.equals("")){
  53:              flow =1;
  54:              tv.setText("請輸入密碼:");
  55:          }
  56:          //lock exist
  57:          else{
  58:              flow =0;
  59:              tv.setText("請輸入原始密碼:");
  60:              
  61:          }
  62:          
  63:          et = (EditText)findViewById(R.id.username_edit);
  64:          et.setHint("輸入密碼");
  65:          
  66:          byes = (Button)findViewById(R.id.buttonYes);
  67:          byes.setOnClickListener(new OnClickListener() {
  68:              
  69:              @Override
  70:              public void onClick(View v) {
  71:                  // TODO Auto-generated method stub
  72:                  
  73:                  checkPassWord();
  74:              }
  75:          });
  76:          
  77:          
  78:          bno = (Button)findViewById(R.id.buttonNo);
  79:          bno.setOnClickListener(new OnClickListener() {
  80:              
  81:              @Override
  82:              public void onClick(View v) {
  83:                  // TODO Auto-generated method stub
  84:                  
  85:                  //use AlertDialog
  86:                  AlertDialog ad = new AlertDialog.Builder(Lock_Flow.this,AlertDialog.THEME_TRADITIONAL).create();
  87:                  ad.setTitle("警告!!");//設定警告標題
  88:                  ad.setMessage("未上鎖,確定返回程序??");
  89:                  
  90:                  ad.setButton2("確定", new DialogInterface.OnClickListener() {// 設定按鈕2
  91:   
  92:                              @Override
  93:                              public void onClick(DialogInterface dialog, int which) {
  94:   
  95:                                  // 點選按鈕2後執行的動作
  96:                                  finishEdit(1);
  97:                              }
  98:                          });
  99:                  ad.setButton("取消", new DialogInterface.OnClickListener() {// 設定按鈕2
 100:   
 101:                      @Override
 102:                      public void onClick(DialogInterface dialog, int which) {
 103:   
 104:                          // 點選按鈕2後執行的動作
 105:                          
 106:                      }
 107:                  });
 108:                  
 109:                  ad.setCanceledOnTouchOutside(true);//當警告提示出現後,點選提示以外範圍,是否會取消提示,預設是true
 110:                  
 111:                  ad.setCancelable(true);//當警告提示出現後,點選其他實體按鈕(backkey等等),是否會取消提示,預設是true
 112:                  
 113:                  ad.show();
 114:                  
 115:                  
 116:                  
 117:              }
 118:          });
 119:      }
 120:      
 121:      void checkPassWord(){
 122:          
 123:          if(flow==0){
 124:              if(et.getText().toString().equals("")){
 125:                  // use Toast
 126:                  
 127:                  Toast.makeText(Lock_Flow.this, "未輸入密碼!!!"+"還剩"+tryNum+"次",Toast.LENGTH_SHORT).show();
 128:                  tryNum--;
 129:                  et.setText("");
 130:              }
 131:              else{
 132:                  
 133:                  String tempstr = et.getText().toString();
 134:                  
 135:                  // get data for accountdetail
 136:                  SharedPreferences sp = getSharedPreferences("bcn", 0);
 137:   
 138:                  // get accountdetail count
 139:                  String passstr = sp.getString("adlock","");
 140:                  
 141:                  if(tempstr.equals(passstr)){
 142:                      Toast.makeText(Lock_Flow.this, "密碼正確!!!",Toast.LENGTH_SHORT).show();
 143:                      flow =1;
 144:                      
 145:                      tv.setText("輸入新密碼:");
 146:                  }
 147:                  else{
 148:                      Toast.makeText(Lock_Flow.this, "密碼錯誤!!!"+"還剩"+tryNum+"次",Toast.LENGTH_SHORT).show();
 149:                      tryNum--;
 150:                  }
 151:                  
 152:              }
 153:              
 154:              if(tryNum<0){
 155:                  
 156:                  //use AlertDialog
 157:                  AlertDialog ad = new AlertDialog.Builder(Lock_Flow.this,AlertDialog.THEME_TRADITIONAL).create();
 158:                  ad.setTitle("更改密碼失敗!!");//設定警告標題
 159:                  ad.setMessage("原始密碼不正確");
 160:                  
 161:                  ad.setButton("返回", new DialogInterface.OnClickListener() {// 設定按鈕2
 162:   
 163:                      @Override
 164:                      public void onClick(DialogInterface dialog, int which) {
 165:                          finishEdit(0);
 166:                      }
 167:                  });
 168:                  
 169:                  ad.setCanceledOnTouchOutside(false);//當警告提示出現後,點選提示以外範圍,是否會取消提示,預設是true
 170:                  
 171:                  ad.setCancelable(false);//當警告提示出現後,點選其他實體按鈕(backkey等等),是否會取消提示,預設是true
 172:                  
 173:                  ad.show();
 174:                  
 175:              }
 176:          }
 177:          else if(flow==1){
 178:              if(et.getText().toString().equals("")){
 179:                  // use Toast
 180:                  Toast.makeText(Lock_Flow.this, "未輸入密碼!!!",Toast.LENGTH_SHORT).show();
 181:                  
 182:                  et.setText("");
 183:              }
 184:              else{
 185:                  
 186:                  String tempstr = et.getText().toString();
 187:                  
 188:                  // get data for accountdetail
 189:                  SharedPreferences sp = getSharedPreferences("bcn", 0);
 190:                  SharedPreferences.Editor spe = sp.edit();
 191:                  
 192:                  spe.putString("adlock", tempstr);// for more putXXX
 193:                  spe.commit();
 194:   
 195:                  //use AlertDialog
 196:                  AlertDialog ad = new AlertDialog.Builder(Lock_Flow.this,AlertDialog.THEME_TRADITIONAL).create();
 197:                  ad.setTitle("上鎖完成!!");//設定警告標題
 198:                  ad.setMessage("密碼為"+tempstr);
 199:                  
 200:                  ad.setButton("返回", new DialogInterface.OnClickListener() {// 設定按鈕2
 201:   
 202:                      @Override
 203:                      public void onClick(DialogInterface dialog, int which) {
 204:                          finishEdit(1);
 205:                      }
 206:                  });
 207:                  
 208:                  ad.setCanceledOnTouchOutside(false);//當警告提示出現後,點選提示以外範圍,是否會取消提示,預設是true
 209:                  
 210:                  ad.setCancelable(false);//當警告提示出現後,點選其他實體按鈕(backkey等等),是否會取消提示,預設是true
 211:                  
 212:                  ad.show();
 213:                  
 214:              }
 215:          }
 216:          
 217:          
 218:      }
 219:      
 220:      public boolean onKeyDown(int keycode, KeyEvent event){
 221:          
 222:          FP.p("keycode:"+keycode);
 223:          FP.p("event:"+event.getAction());
 224:          
 225:          finishEdit(1);
 226:          
 227:          switch(keycode){
 228:              
 229:          // menu key
 230:          case 82:
 231:              
 232:              break;
 233:          }
 234:          
 235:          return super.onKeyDown(keycode, event);
 236:      }
 237:      
 238:      /**
 239:       * 
 240:       * @param result 0 ok
 241:       */
 242:      void finishEdit(int result){
 243:          
 244:          if(result==0){
 245:              Lock_Flow.this.setResult(0);
 246:              
 247:              Lock_Flow.this.finish();
 248:              
 249:              overridePendingTransition(R.anim.zoom_enter, R.anim.zoom_exit);
 250:          }
 251:          else if(result==1){
 252:              
 253:              Lock_Flow.this.setResult(1);
 254:              
 255:              Lock_Flow.this.finish();
 256:              
 257:              overridePendingTransition(R.anim.zoom_enter, R.anim.zoom_exit);
 258:          }
 259:      }
 260:      
 261:      
 262:  }

第 30 行 flow=0代表已經有鎖, 必須先解鎖,而flow=1,代表沒有鎖,可以直接輸入密碼上鎖

結果為


EditText 的使用


EditText 用來輸入編輯資料,它繼承自 TextView,許多在 TextView中的方法也可以在這使用, 可藉由 xml 來定義, 其中參數可以調整輸入資料格式,長度等等,一個 EditText 在 xml 中定義如下

   1:      <EditText
   2:          android:id="@+id/editTextTime"
   3:          android:layout_width="wrap_content"
   4:          android:layout_height="wrap_content"
   5:          android:ems="10"
   6:          android:inputType="date" >
   7:          <requestFocus />
   8:      </EditText>

第 5 行限制字數為 10 個字元
第 6 行限制輸入格式為 date

也有一些常用的方法如下

   1:          //get EditText
   2:          EditText etMoney = (EditText) findViewById(R.id.editTextMoney);
   3:          etMoney.setText("0000");
   4:          etMoney.getText().toString(); 
   5:          etMoney.setHint("提示");
   6:          etMoney.setInputType(InputType.TYPE_NULL);// disappear keyboard

特殊方法
1.
點擊 EditText 關閉原本的 keyboard, 並跳出調整日期選項,調整完再設定到 EditText 中

   1:          //get edTime
   2:          etTime = (EditText) findViewById(R.id.editTextTime);        
   3:          //get now date
   4:          final Calendar cal = Calendar.getInstance();
   5:          String dateStr = "" + cal.get(Calendar.YEAR) // 2012
   6:                  + "/" + (cal.get(Calendar.MONTH) + 1) // 12 (add 1 because it start from 0)
   7:                  + "/" + cal.get(Calendar.DATE);// 24
   8:                                                  // ....
   9:          //now date set to etTime
  10:          etTime.setText(dateStr);
  11:          // set keyboard disappear
  12:          etTime.setInputType(InputType.TYPE_NULL);
  13:          // touch etTime will show datePickDialog
  14:          etTime.setOnClickListener(new OnClickListener() 
  15:          {
  16:              
  17:              @Override
  18:              public void onClick(View v) {
  19:                  // TODO Auto-generated method stub
  20:                  
  21:                  new DatePickerDialog(ADEdit_Flow.this, new DatePickerDialog.OnDateSetListener()
  22:                  {
  23:                      
  24:                      @Override
  25:                      public void onDateSet(DatePicker view, int year, int monthOfYear,
  26:                              int dayOfMonth) {
  27:                          // TODO Auto-generated method stub
  28:                          etTime.setText(""+year+"/"+(monthOfYear+1)+"/"+dayOfMonth);
  29:                          FP.p("touch");
  30:                      }
  31:                  }, cal.get(Calendar.YEAR), cal.get(Calendar.MONTH), cal.get(Calendar.DATE)).show();
  32:              }
  33:          });

2.
檢查輸入字數不可超過 7 位數,超過出現提示並重新輸入

   1:          //get EditText
   2:          EditText etMoney = (EditText) findViewById(R.id.editTextMoney);
   3:          etMoney.setText("100");
   4:          
   5:          etMoney.addTextChangedListener(new TextWatcher() {
   6:              
   7:              @Override
   8:              public void onTextChanged(CharSequence s, int start, int before, int count) {
   9:                  // TODO Auto-generated method stub
  10:                  
  11:              }
  12:              
  13:              @Override
  14:              public void beforeTextChanged(CharSequence s, int start, int count,
  15:                      int after) {
  16:                  // TODO Auto-generated method stub
  17:                  
  18:              }
  19:              
  20:              @Override
  21:              public void afterTextChanged(Editable s) {
  22:                  // TODO Auto-generated method stub
  23:                  if(s.length()>7){
  24:                      Toast.makeText(ADEdit_Flow.this, "最大輸入7位數字,請重新輸入",Toast.LENGTH_SHORT).show();
  25:                      s.clear();
  26:                  }
  27:              }
  28:          });

3.
若字串開頭部分有0,去掉0再重整,如 00987 -> 987,原理是藉由 Integer 的 parseInt() 來達成

   1:  String temps =  etMoney.getText().toString();//只要可以轉換為字串即可   
   2:  int tempi = Integer.parseInt(temps);
   3:  String.valueOf(tempi);


取得系統時間(Calendar)


使用 Calendar 取得系統時間, getInstance() 取得實體,使用 get() 傳入想顯示的資料

   1:  Calendar cal = Calendar.getInstance();
   2:  String dateStr = ""+cal.get(Calendar.YEAR) //2012
   3:  +"/"+(cal.get(Calendar.MONTH)+1) //11 (add 1 because it start from 0)
   4:  +"/"+cal.get(Calendar.DATE);//13
   5:  //Calendar.xxx more date


結果如下


Activity 之間的切換與傳送資料(Activity+Bundle)


在前幾篇的 "啟動新 Activity" 中,介紹如何在舊 Activity 中啟動新的 Activity,如果情況是 Activity 互相切換甚至它們還能傳送數值,要如何做到呢? 很簡單,一樣使用 Intent 設定要切換的 Activity ,接著利用 Bundle 綁定數值,就能達到目的了,以下建立 2 個 Activity

第 1 個 MainActivity

   1:  package com.example.androidtestproject;
   2:   
   3:  import android.app.Activity;
   4:  import android.content.Intent;
   5:  import android.os.Bundle;
   6:  import android.view.Menu;
   7:  import android.view.View;
   8:  import android.view.View.OnClickListener;
   9:  import android.widget.Button;
  10:  import android.widget.TextView;
  11:   
  12:  public class MainActivity extends Activity {
  13:   
  14:      Button bright;
  15:   
  16:      TextView tv1;
  17:   
  18:      int num;
  19:   
  20:      @Override
  21:      public void onCreate(Bundle savedInstanceState) {
  22:          super.onCreate(savedInstanceState);
  23:          setContentView(R.layout.activity_main);
  24:   
  25:          Bundle b = this.getIntent().getExtras();
  26:          if (b != null) {
  27:              num = b.getInt("num");
  28:          }
  29:   
  30:          tv1 = (TextView) findViewById(R.id.text1);
  31:   
  32:          tv1.setText("MainActivity1: " + num);
  33:   
  34:          bright = (Button) findViewById(R.id.buttonright);
  35:          bright.setOnClickListener(new OnClickListener() {
  36:   
  37:              @Override
  38:              public void onClick(View v) {
  39:                  // TODO Auto-generated method stub
  40:   
  41:                  Bundle b = new Bundle();
  42:                  num++;
  43:                  b.putInt("num", num);
  44:   
  45:                  Intent inte = new Intent();
  46:                  inte.setClass(MainActivity.this, MainActivity2.class);
  47:                  inte.putExtras(b);
  48:   
  49:                  startActivity(inte);
                       MainActivity.this.finish();
  50:              }
  51:          });
  52:   
  53:      }
  54:   
  55:  }

第 23 行的 R.layout.activity_main 內容如下,裡面只有 1 個按鈕,和 1 個 TextView

   1:  <RelativeLayout xmlns:android="http://schemas.android.com/apk/res/android"
   2:      xmlns:tools="http://schemas.android.com/tools"
   3:      android:layout_width="match_parent"
   4:      android:layout_height="match_parent" >
   5:   
   6:      <TextView
   7:          android:id="@+id/text1"
   8:          android:layout_width="wrap_content"
   9:          android:layout_height="wrap_content"
  10:          android:layout_centerHorizontal="true"
  11:          android:layout_centerVertical="true"
  12:          android:text="@string/hello_world"
  13:          tools:context=".MainActivity" />
  14:   
  15:      <Button
  16:          android:id="@+id/buttonright"
  17:          android:layout_width="wrap_content"
  18:          android:layout_height="wrap_content"
  19:          android:layout_alignParentBottom="true"
  20:          android:layout_alignParentRight="true"
  21:          android:text="activity2" />
  22:   
  23:  </RelativeLayout>


第 25 ~ 28 行為取得從 MainActivity2 傳來的資料,注意第 26 行檢查 b 是否為 null , 因為在啟動程序時並不會有數值傳送,如果沒有檢查第 27 行就會出現錯誤
第 41 ~ 43 行為建立 Bundle 物件 b , 並放入數值 num , 放入的方式是 key - value 對應,在另 1 個 Activity 中取得數值時也必須藉由 key 來取得
第 45 ~ 46 行為設定切換的 Activity , 第 1 個參數為自己本身, 第 2 個參數為另 1 個 Activity
第 47 行將第 41 行建立的 b 放入以便傳送
第 49 行開始切換

接著是第 2 個 MainActivity 的內容

   1:  package com.example.androidtestproject;
   2:   
   3:  import android.app.Activity;
   4:  import android.content.Intent;
   5:  import android.os.Bundle;
   6:  import android.view.View;
   7:  import android.view.View.OnClickListener;
   8:  import android.widget.Button;
   9:  import android.widget.TextView;
  10:   
  11:  public class MainActivity2 extends Activity {
  12:   
  13:      Button bright;
  14:   
  15:      TextView tv1;
  16:   
  17:      int num;
  18:   
  19:      @Override
  20:      public void onCreate(Bundle savedInstanceState) {
  21:          super.onCreate(savedInstanceState);
  22:          setContentView(R.layout.activity_main2);
  23:   
  24:          Bundle b = this.getIntent().getExtras();
  25:          num = b.getInt("num");
  26:   
  27:          tv1 = (TextView) findViewById(R.id.text2);
  28:          tv1.setText("MainActivity2: " + num);
  29:   
  30:          bright = (Button) findViewById(R.id.buttonright);
  31:          bright.setOnClickListener(new OnClickListener() {
  32:   
  33:              @Override
  34:              public void onClick(View v) {
  35:                  // TODO Auto-generated method stub
  36:   
  37:                  Bundle b = new Bundle();
  38:                  num++;
  39:                  b.putInt("num", num);
  40:   
  41:                  Intent inte = new Intent();
  42:                  inte.setClass(MainActivity2.this, MainActivity.class);
  43:                  inte.putExtras(b);
  44:   
  45:                  startActivity(inte);
                       MainActivity2.this.finish();
  46:              }
  47:          });
  48:   
  49:      }
  50:  }

內容和第 1 個 MainActivity 相當類似,只差沒有檢查 b 是否為 null , 因為這個 Activity 預設並不會先啟動,一定會有 Activity 傳資料給它

結果為
一開始的 Activity 畫面,數值為 0


點選右下方的 button 之後,數值增加


自訂標籤頁(TabHost+TabWidget)的使用


在 "標籤頁(TabHost+TabWidget)的使用" 提到預設標籤頁的使用,實際上的應用卻不會使用預設標籤頁,因為介面美觀實在不夠,1個好的應用除了內容外,其 UI 的包裝也是相當重要, 這裡介紹如何使用自訂的標籤頁,如下圖


首先來看看 TabHost 套用的佈局檔,如下

   1:  <?xml version="1.0" encoding="utf-8"?>
   2:  <TabHost xmlns:android="http://schemas.android.com/apk/res/android"
   3:      android:id="@android:id/tabhost"
   4:      android:layout_width="fill_parent"
   5:      android:layout_height="fill_parent" >
   6:   
   7:      <LinearLayout
   8:          android:id="@+id/LinearLayout01"
   9:          android:layout_width="fill_parent"
  10:          android:layout_height="fill_parent"
  11:          android:orientation="vertical" >
  12:   
  13:          <!-- Admob add here -->
  14:   
  15:          <LinearLayout
  16:              android:id="@+id/AdLayout"
  17:              android:layout_width="wrap_content"
  18:              android:layout_height="wrap_content" >
  19:          </LinearLayout>
  20:   
  21:          <TabWidget
  22:              android:id="@android:id/tabs"
  23:              android:layout_width="fill_parent"
  24:              android:layout_height="wrap_content"
  25:              android:visibility="gone" />
  26:   
  27:          <!-- framelayout put here will be buttom -->
  28:   
  29:          <RadioGroup
  30:              android:id="@+id/tab_group"
  31:              android:layout_width="fill_parent"
  32:              android:layout_height="50dp"
  33:              android:layout_gravity="bottom"
  34:              android:background="@drawable/background1"
  35:              android:checkedButton="@+id/tab1"
  36:              android:gravity="center_vertical"
  37:              android:orientation="horizontal" >
  38:   
  39:  <!--             button set null that will remove default radio button -->
  40:   
  41:              <RadioButton
  42:                  android:id="@id/tab1"
  43:                  android:layout_width="fill_parent"
  44:                  android:layout_height="fill_parent"
  45:                  android:layout_marginTop="1.0dip"
  46:                  android:layout_weight="1.0"
  47:                  android:background="@drawable/tab_bg_selector"
  48:                  android:button="@null"
  49:                  android:gravity="center"
  50:                  android:tag="tab1"
  51:                  android:text="消費清單" />
  52:   
  53:              <RadioButton
  54:                  android:id="@+id/tab2"
  55:                  android:layout_width="fill_parent"
  56:                  android:layout_height="fill_parent"
  57:                  android:layout_marginTop="1.0dip"
  58:                  android:layout_weight="1.0"
  59:                  android:background="@drawable/tab_bg_selector"
  60:                  android:button="@null"
  61:                  android:gravity="center"
  62:                  android:text="本日消費" />
  63:   
  64:              <RadioButton
  65:                  android:id="@+id/tab3"
  66:                  android:layout_width="fill_parent"
  67:                  android:layout_height="fill_parent"
  68:                  android:layout_marginTop="1.0dip"
  69:                  android:layout_weight="1.0"
  70:                  android:background="@drawable/tab_bg_selector"
  71:                  android:button="@null"
  72:                  android:gravity="center"
  73:                  android:text="本周消費" />
  74:   
  75:              <RadioButton
  76:                  android:id="@+id/tab4"
  77:                  android:layout_width="fill_parent"
  78:                  android:layout_height="fill_parent"
  79:                  android:layout_marginTop="1.0dip"
  80:                  android:layout_weight="1.0"
  81:                  android:background="@drawable/tab_bg_selector"
  82:                  android:button="@null"
  83:                  android:gravity="center"
  84:                  android:text="本月消費" />
  85:          </RadioGroup>
  86:   
  87:          <!-- framelayout put here will be Top -->
  88:          <FrameLayout
  89:              android:id="@android:id/tabcontent"
  90:              android:layout_width="fill_parent"
  91:              android:layout_height="0.0dip"
  92:              android:layout_weight="1.0" />
  93:          
  94:      </LinearLayout>
  95:   
  96:  </TabHost>

第 7 行指出使用垂直線性排版
第 8 ~ 11 行為 LinearLayout 的內容
第 13 ~ 19 行為 Admob 的使用,如果沒有 admob 可以忽略
第 21 ~ 25 行為原先的 TabWidget ,注意 25 行我們直接讓它不顯示,也不會作用
第 29 ~ 85 行為取代 TabWidget 的 RadioGroup , 裡面有 4 個 RadioButton 分別在 41, 53, 64, 75 行
第 32 行設定高度
第 33 行設定在畫面底部
第 34 行設定底圖為 background1,為1張 png 圖,它會設定在整個按鈕的下方,注意這張圖的寬高
第 36 行設定其內容按鈕為橫向排列
第 41 ~ 51 行為第 1 個按鈕的設定
第 42 行設定其 id, 注意這個 id 名稱會連結到程式碼中
第 43 ~ 44 行設定尺寸
第 45 行距離上方多 1 dp
第 46 行設定 weight 為 1.0
第 47 行設定按鈕的格式為 xml 檔,注意它決定按鈕顯示的外觀,其內容如下

   1:  <?xml version="1.0" encoding="utf-8"?>
   2:  <selector xmlns:android="http://schemas.android.com/apk/res/android">
   3:   
   4:      <item android:drawable="@drawable/button1" android:state_focused="true"/>
   5:      <item android:drawable="@drawable/button2" android:state_pressed="true"/>
   6:      <item android:drawable="@drawable/button3" android:state_checked="true"/>
   7:   
   8:  </selector>

第 4 行無作用
第 5 行為按鈕被按下的顯示圖片,注意圖片寬高
第 6 行為按鈕被選擇的顯示圖片,注意圖片寬高

第 48 行設定為 null ,以去除預設的按鈕外觀
第 50 行設定其 tag, 注意這個 tag 名稱會連結到程式碼中
第 51 行設定顯示字樣,其他按鈕也是類似的設定
第 88 ~ 92 行為 framelayout 的設定, 注意它也可以放在第 27 行 ,如此按鈕們都會移動到畫面底部

看完  TabHost 套用的佈局檔後,接著來看看其程式碼

   1:  package com.example.helloworld;
   2:   
   3:  import android.app.TabActivity;
   4:  import android.content.Intent;
   5:  import android.os.Bundle;
   6:  import android.view.animation.Animation;
   7:  import android.view.animation.ScaleAnimation;
   8:  import android.widget.LinearLayout;
   9:  import android.widget.RadioButton;
  10:  import android.widget.RadioGroup;
  11:  import android.widget.RadioGroup.OnCheckedChangeListener;
  12:  import android.widget.TabHost;
  13:   
  14:  import com.google.ads.AdRequest;
  15:  import com.google.ads.AdSize;
  16:  import com.google.ads.AdView;
  17:   
  18:  @SuppressWarnings("deprecation")
  19:  public class Table_Flow extends TabActivity{
  20:   
  21:      
  22:      private RadioGroup tabGroup;
  23:      
  24:      private RadioButton rb1;
  25:      private RadioButton rb2;
  26:      private RadioButton rb3;
  27:      private RadioButton rb4;
  28:      
  29:      private TabHost thost;
  30:      
  31:      public void onCreate(Bundle savedInstanceState){
  32:          super.onCreate(savedInstanceState);
  33:          
  34:          setContentView(R.layout.table_host);
  35:          
  36:  //        showAdmob();
  37:          
  38:          initView();
  39:      }
  40:      
  41:      
  42:      void initView(){
  43:          
  44:          thost = getTabHost();// build tabhost
  45:          
  46:          tabGroup = (RadioGroup) findViewById(R.id.tab_group);
  47:          
  48:          rb1 = (RadioButton)findViewById(R.id.tab1);
  49:          rb2 = (RadioButton)findViewById(R.id.tab2);
  50:          rb3 = (RadioButton)findViewById(R.id.tab3);
  51:          rb4 = (RadioButton)findViewById(R.id.tab4);
  52:          
  53:          Intent inte1 = new Intent(this, Table_widget4.class);
  54:          Intent inte2 = new Intent(this, Table_widget1.class);
  55:          Intent inte3 = new Intent(this, Table_widget2.class);
  56:          Intent inte4 = new Intent(this, Table_widget3.class);
  57:          
  58:          thost.addTab(thost.newTabSpec("TAB1").setIndicator("tab1").setContent(inte1));
  59:          thost.addTab(thost.newTabSpec("TAB4").setIndicator("tab4").setContent(inte2));
  60:          thost.addTab(thost.newTabSpec("TAB2").setIndicator("tab2").setContent(inte3));
  61:          thost.addTab(thost.newTabSpec("TAB3").setIndicator("tab3").setContent(inte4));
  62:                  
  63:          
  64:          tabGroup.setOnCheckedChangeListener(new    OnTabChangeListener());
  65:   
  66:      }
  67:      
  68:       private class OnTabChangeListener implements OnCheckedChangeListener {
  69:   
  70:              @Override
  71:              public void onCheckedChanged(RadioGroup group, int id) {
  72:                  // TODO Auto-generated method stub
  73:                  
  74:                  //button anim
  75:                  Animation scalybig = new ScaleAnimation(0.0f, 1.0f, 0.0f, 1.0f);
  76:                  scalybig.setDuration(500);
  77:                  
  78:                  
  79:                  switch(id){
  80:                  
  81:                  case R.id.tab1:
  82:                      thost.setCurrentTabByTag("TAB1");                    
  83:                      rb1.startAnimation(scalybig);                    
  84:                      break;
  85:                      
  86:                  case R.id.tab2:
  87:                      thost.setCurrentTabByTag("TAB2");        
  88:                      rb2.startAnimation(scalybig);                    
  89:                      break;
  90:                      
  91:                  case R.id.tab3:
  92:                      thost.setCurrentTabByTag("TAB3");                
  93:                      rb3.startAnimation(scalybig);                    
  94:                      break;
  95:                      
  96:                  case R.id.tab4:
  97:                      thost.setCurrentTabByTag("TAB4");                    
  98:                      rb4.startAnimation(scalybig);
  99:   
 100:                      break;
 101:                  }
 102:                  
 103:              }
 104:              
 105:       }
 106:      
 107:      
 108:      void showAdmob(){
 109:          
 110:      AdView adView;
 111:          
 112:  //        Create the adView     
 113:         adView = new AdView(this, AdSize.BANNER, "a150189a3abeb1a");      
 114:   
 115:         LinearLayout layout = (LinearLayout)findViewById(R.id.AdLayout);      
 116:            
 117:         layout.addView(adView);
 118:         
 119:         adView.loadAd(new AdRequest()); 
 120:      }
 121:  }
 122:   
 123:   
 124:   

事實上內容也沒有太大的改變,只是加入 RadioGroup
第 34 行套用上述的佈局檔
第 36 行為 Admob 的使用,目前不用
第 46 行取得 RadioGroup, 注意 id 要對應 xml 中的設定
第 48 ~ 51 行取得 4 個按鈕, 我針對按鈕有做點選後的動畫
第 53 ~ 56 行設定 4 個 Intent
第 58 ~ 61 行設定 4 個按鈕對應的內容, 注意 setIndicator("") 和 setContent(),其傳入參數必須對應 xml 中的設定
第 64 行設定按鈕們的監聽器,其內容在 68 ~ 105 行
第 71 行覆寫 onCheckedChanged 方法
第 75 ~ 76 行為按鈕被按下時播放的動畫
第 79 ~ 101 行為按鈕按下切換的方法,注意 case 對應的 id 和 setCurrentTabByTag 的 id 必須符合


Twitter Delicious Facebook Digg Stumbleupon Favorites More

 
Design by Free WordPress Themes | Bloggerized by Lasantha - Premium Blogger Themes | Affiliate Network Reviews